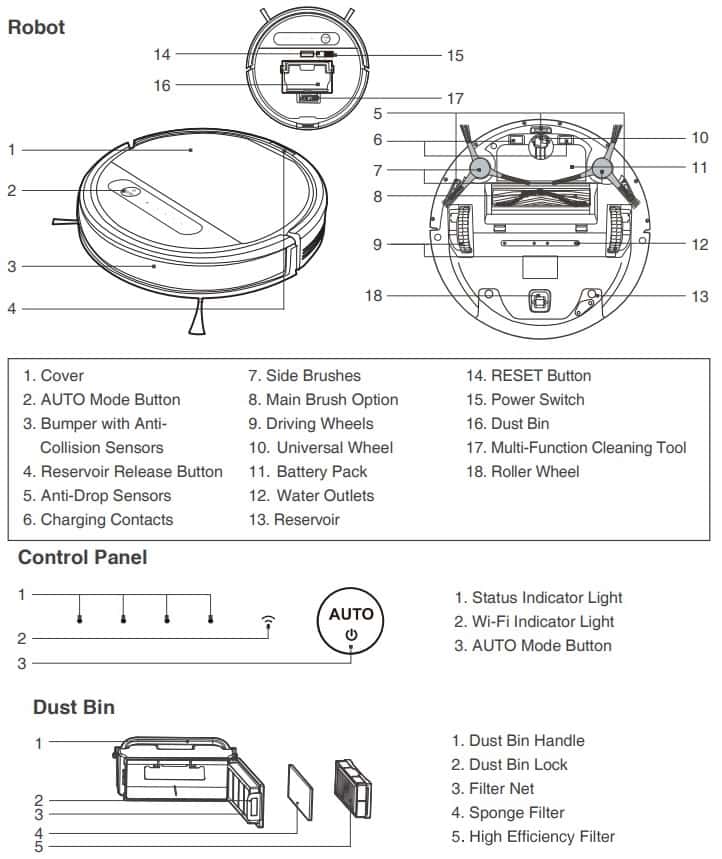
Ecovacs Deebot Robot Vacuum Cleaner; If DEEBOT detects a problem and needs your assistance, it emits alarm beeps or the Status Indicator Light illuminates.
| Alarm Sound | Solution |
|---|---|
| One Beep | Status Indicator Light flashes RED. Driving Wheel Malfunction. Check Driving Wheels for tangled hair or debris and clean. |
| Two Beeps | Status Indicator Light flashes RED. Main Brush Malfunction. Check Main Brush for tangled hair or debris and clean. |
| Three Beeps | Status Indicator Light flashes RED. Driving Wheel Malfunction Turn over the robot. Press Driving Wheels to check for a clicking sound. |
| Three Beeps | Status Indicator Light flashes RED. DEEBOT gets into trouble while working and stops. Manually remove the obstacles and restart DEEBOT. |
| Four Beeps | Status Indicator Light flashes RED. Dust Bin Malfunction. Remove the Dust Bin and reinstall it properly. If the robot still emits the alarm, please contact Customer Service. |
| Five Beeps | Status Indicator Light flashes RED. Low Battery Manually place the robot on the Docking Station to charge. |
| Six Beeps | Status Indicator Light flashes RED. Side Brush Malfunction. Check Side Brush for tangled hair or debris and clean. |
| Seven Beeps | Status Indicator Light flashes RED. Anti-Drop Sensor Malfunction. Check Anti-Drop Sensors for dust and clean. |
| Eight Beeps | Status Indicator Light flashes RED. DEEBOT is powered OFF while charging. Power ON the robot. |
| Other | Status Indicator Light flashes twice and goes out once DEEBOT is powered ON. DEEBOT has low battery. Power ON the robot. Manually place the robot on the Docking Station and charge. |
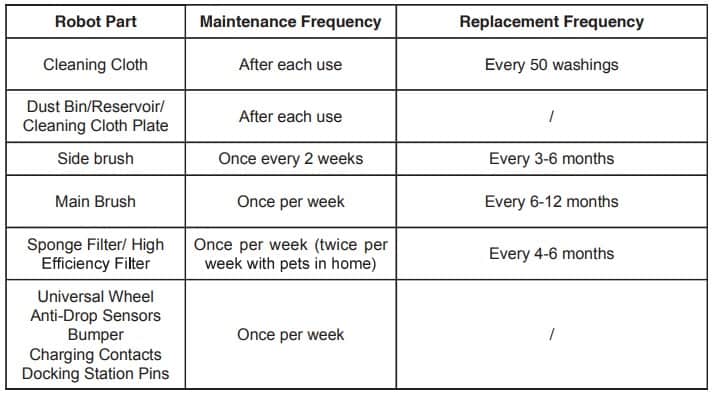
Regular Maintenance: To keep DEEBOT running at peak performance, perform the maintenance and replacement according to the following frequency. A multi-Function Cleaning Tool is provided for easy maintenance. Handle with care, this cleaning tool has sharp edges.

Troubleshooting
Please use this chart to troubleshoot common problems using DEEBOT.
| Malfunction | Possible Causes |
|---|---|
| DEEBOT will not charge. | DEEBOT is not powered ON. Move the robot’s Power Switch to the ON position. |
| DEEBOT has not made a connection with the Docking Station. Be sure that the robot’s Charging Contacts have made a connection with the Docking Station Pins. You may move the robot manually to make the connection if necessary. | |
| Docking Station is unplugged while DEEBOT is powered ON, which causes battery consumption. Plug in the Docking Station and ensure DEEBOT is powered ON. Keep DEEBOT on the Docking Station to make sure it has full battery to work at any time. | |
| The battery is completely discharged. Re-activate the battery. Place DEEBOT on the Docking Station by hand, remove after charging for 3 minutes, repeat 3 times; then charge normally. | |
| DEEBOT cannot return to the Docking Station. | The Docking Station is not placed properly. |
| DEEBOT gets into trouble while working and stops. | DEEBOT is tangled with something on the floor (electrical cords, drooping curtains, area rug fringe etc.). DEEBOT will try various ways to get itself out of trouble. If it is unsuccessful, check the Side Brushes and remove anything tangled around the Side Brushes, or manually remove the obstacles and restart. |
| DEEBOT returns to the Docking Station before it finishes cleaning. | When battery power gets low, DEEBOT automatically switches to Return to Charger Mode and returns to the Docking Station to recharge itself. This is normal. No solution necessary |
| Working time varies according to floor surface, room complexity and the selected Cleaning Mode. This is normal. No solution necessary. | |
| DEEBOT will not clean automatically at scheduled time. | Intelligent Scheduling or Time Scheduling function is cancelled. |
| DEEBOT is powered OFF. Power ON DEEBOT. | |
| The robot’s battery is low. Keep DEEBOT powered ON and on the Docking Station to make sure it has full battery to work at any time. | |
| The robot’s Suction Intake is blocked and/or its components are tangled with debris. Turn the robot’s power OFF, clean the Dust Bin and invert the robot. Clean the robot’s Suction Intake and Side Brushes. | |
| DEEBOT misses cleaning area. | The cleaning area needs tidying up. Please remove small objects from the floor, and tidy up the cleaning area before DEEBOT starts cleaning. |
| Remote Control failure | The batteries in the Remote Control need to be replaced. Replace with new batteries making sure they are installed correctly. |
| DEEBOT is powered OFF or the robot’s battery is low. Make sure DEEBOT is powered ON and fully charged. | |
| The infrared signal cannot be transmitted because the Infrared Emitter on Remote Control or the Infrared Receiver on DEEBOT is dirty. Use clean dry cloth to wipe the Infrared Emitter on Remote Control and the Infrared Receiver on DEEBOT. | |
| There is other equipment interfering with the infrared signal to DEEBOT. Avoid using the Remote Control near other equipment using infrared signals. | |
| The water is not coming out of the Reservoir when DEEBOT is mopping. | The Magnet on the Cleaning Cloth Plate comes off. |
| The Reservoir runs out of water. Add water into the Reservoir. | |
| The water outlets on the bottom of DEEBOT are clogged. Check the water outlets on the bottom and clean. |

Cleaning Mode

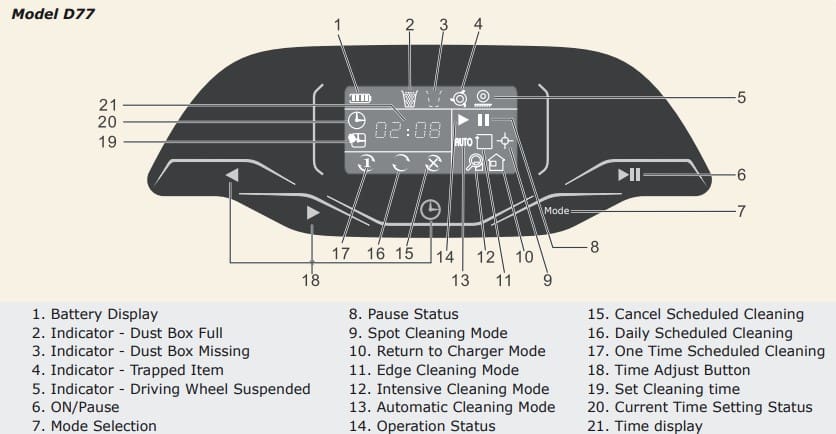
- AUTO Cleaning Mode: This is the most commonly used mode and is good for every day cleaning. AUTO Cleaning Mode cleans using the Cleaning Pattern set in the previous step. Random Cleaning Pattern is best for carpet. When the cleaning cycle is complete, DEEBOT returns to the Docking Station.
- Spot Cleaning Mode: This mode is applicable for an area of highly concentrated dirt or dust. In Spot Cleaning Mode, DEEBOT focuses on a specific area to clean.
- Edge Cleaning Mode: This mode is good for cleaning the edges and corners of a room. In Edge Cleaning Mode, DEEBOT cleans along a border (e.g. wall).

Deebot Slim Ecovacs Robot Vacuum Cleaner Manual PDF
Deebot 600 Ecovacs Robot Vacuum Cleaner Manual PDF
Deebot D77 Robot Vacuum Cleaner Manual PDF
Deebot OZMO T8 Robot Vacuum Cleaner Manual PDF
Deebot M88 Ecovacs Robot Vacuum Cleaner Manual PDF
Deebot 900 Ecovacs Robot Vacuum Cleaner Manual PDF
Comments