Electrolux Robot Vacuum Cleaner Error Codes
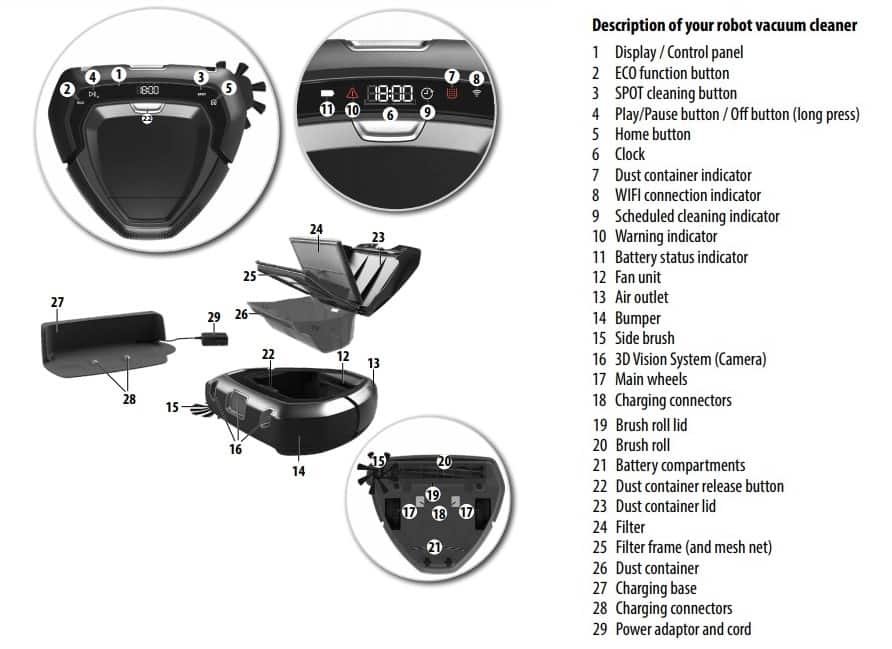
- If an error occurs, the robot stops cleaning. The warning icon will pulse and the digits “E:” followed by an error code, is shown on the display. The speaker will also describe the error. After an error has occured, press any button to play the audio message again.
- When an error is resolved, press Play/Pause button to start cleaning.

| Error Codes | Solutions |
|---|---|
| E:10 | The bumper is stuck Please make sure the bumper can move properly and remove any debris that might block it. |
| E:11 | Right wheel is stuck Check that all parts turn freely. |
| E:12 | Left wheel is stuck. Clean and remove entangled threads from parts if needed. |
| E:13 | Brush roll is stuck. Clean and remove entangled threads from parts if needed. |
| E:14 | Side brush is stuck. Replace Brush roll or Side brush if damaged. |
| E:15 | The robot is stuck or unable to navigate. Lift and place the robot where it can move freely. |
| E:16 | The 3D Vision System is blocked or dusty. Clean the 3D Vision System and make sure nothing is blocking the sight. |
| E:17 | The robot is operating on a surface which is too slippery. Move the robot and charger to a new location and start again. |
| E:20 | Incorrect Charging base is used. Only use the original Electrolux Charging base, supplied with the robot. If the Charging base needs to be replaced; use Electrolux Charging base. |
| E:21 | Batteries are malfunctioning during use. Change the 2 battery packs. |
| E:22 | Product temperature is too high. Let the robot paused outside the charging station for 6 hours. |
| E:23 | Batteries are not properly connected to the robot. Connect batteries to robot. |
| E:30 | Software is not working correctly. Please update the robot’s software. |
| E:31 | Software upgrade has failed. Please redo software update. |
| E:40 | Contact an authorized Electrolux service center. |
| E:41 | Internal error. Please restart desired operation. |
| E:42 | Internal error. Please restart desired operation. |
Changing the batteries
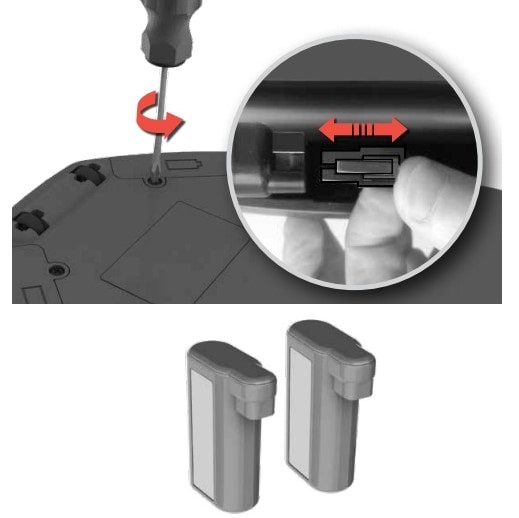
- The battery compartments are located on the bottom side of the robot. Use a screwdriver (PH2) to unscrew the battery compartment lids. Replace the battery packs and refit the battery compartment lids. Caution! Make sure to change the two battery packs at the same time.
- Use only original supplier batteries. Batteries must be removed and disposed of safely, before desposing of the machine.
Cleaning the Filter
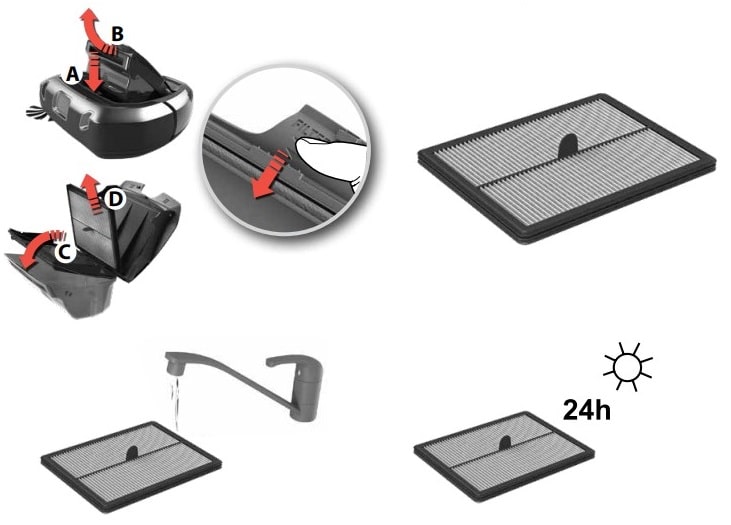
- For best performance, we recommend to clean the filter every 5th cleaning and to replace it every 6 months.
- Remove the filter: Remove the Dust container by swinging it upwards (B). Open the lid by swinging it upwards. Swing the Filter frame downwards (C). Remove the filter (D).
- Rinse the filter with cold water. Tap the filter frame to remove water. Let dry for 24 hours before placing it back in the machine.
Turn the robot off
There is also the possibility to turn the robot completely off, in case you are not using it for a certain amount of time. To do this, please follow the steps:
- Press the play button on the robot for approx. 7 seconds.
- “OFF” is shown on the display.
- When the display turns dark, the robot is fully of.
ECO mode: For a lighter cleaning, press the ECO button to reduce the power, prolong the running time and reduce noise level. The robot will stay in ECO mode until the button is pressed again.
How to connect to the ”PUREi9” APP?
- Download the ”PUREi9” App in the App Store or Google play and then follow the instruction to create the account and connect to the robot. Note: Make sure that the phone is connected to the home WiFi (2.4 GHz).
- During the process the App will ask you to turn the robot upside down to activate the WiFi module and scan the serial number bar code (A) or enter it manually (B). Then continue following the instruction from the App. Note: before turning the robot, make sure that it has been switched on for at least one minute.
- When the setup is completed, turn the robot back to its normal position. The WiFi symbol (A) will be lit up to indicate that the robot is connected to your home network. Note: it could take a few moments for the robot clock to automatically synchronise with your mobile device. Note: Pulsing WiFi symbol indicates that the robot is trying to connect to the network.

Comments