To reduce the risk of electric shock, turn power switch off and disconnect plug from electrical outlet before performing maintenance or troubleshooting checks.
Bissell Robot Vacuum Cleaner – LED Error Code (power LED flashes red)
| Error Codes | Solution |
|---|---|
| E1 | The wheel is stuck. Remove vacuum from obstacles, and restart the power switch. |
| E2 | The top cover or dust bin is not installed properly. Install the top cover and dust bin properly. The unit will detect the error and fix automatically. If the unit does not fix automatically, turn the unit off and back on. |
| E3 | The bumper is stuck. Remove vacuum from obstacles. The unit will detect the error and fix automatically |
| E4 | The unit was lifted up from the floor. Put vacuum back on the floor. |
| E5 | The color of the floor is too dark Remove robot from the flooring. Use virtual wall to keep the robot off of the flooring. |
| E6 | The battery is not installed properly. Charging error. (Power switch is off) To install the battery properly, please refer to page 5 for battery installation, and turn on the power switch after installation is complete. |
| Lo | Battery Low: Battery needs to be charged. (Power LED turns Red) |
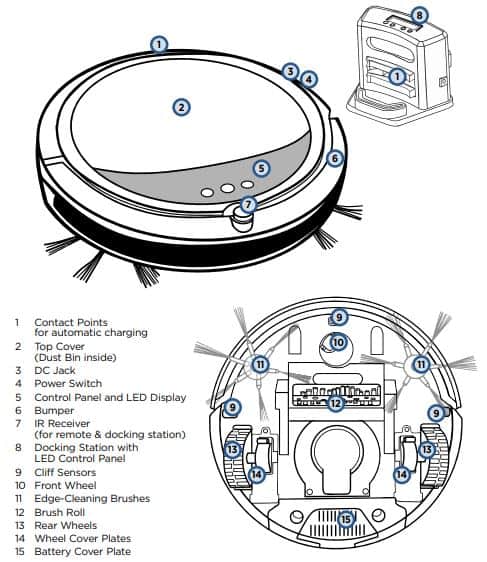
Battery Installation – Removal
Do Not Remove The Plastic Shrink Sleeve From The Battery Pack.
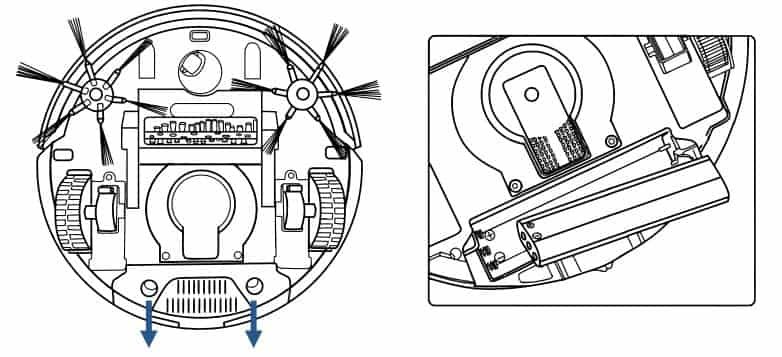
To install the battery: First, turn the power switch to the off position. Press on the two circles of the battery cover and slide the cover towards you and insert the battery.
Install the battery in the compartment, ensuring the +/- terminals of the battery match the +/- indicators in the battery compartment.
Cleaning the Sensors
After repeated use, dirt and dust can accumulate on the sensors of the vacuum and the working efficiency can be reduced. To ensure the best efficiency, the sensors should be cleaned off periodically by brushing any dirt or debris from them. Before cleaning the sensors, ensure the robot is not attached to the charging cable or dock and the power switch is in the off position.
Cleaning the Intake
After repeated use, dirt and dust can accumulate around the intake of the vacuum and the working efficiency can be reduced. To ensure the best efficiency and constant airflow, the intake should be cleaned periodically by removing any debris from the intake or brushroll. Before cleaning the intake ensure the robot is not attached to the charging cable or dock, and the power switch is in the off position.
Troubleshooting
| Problem | Possible causes-Remedies |
|---|---|
| Low or no suction | The Dust Bin is full. Empty the Dust Bin. |
| Side brushes do not operate properly | Cleaning is required. If side brushes become crooked or dirty, soak them in hot water to return to its original shape. Let them dry completely. |
| Battery is not charging | Power switch is not in the on position. Flip the switch to the on position and place the robot on the charging base or plug in the power cord directly. |
| LED display doesn’t light up | Battery is not installed correctly. |
| Very low battery | |
| Power Switch on the Vacuum is turned off. Turn the power switch located by the unit’s charging port is on. | |
| Filter is missing. Check to see if the filter is in place. | |
| Vacuum will not start | The battery is not installed properly. |
| Battery power is low. Charge the battery. | |
| The top cover is not installed properly. Close the Top Cover and turn vacuum on again. | |
| Doesn’t return to base after cleaning | Mode not set with Docking LED Icon. Change mode. |
| Cleaning interrupted by error code or full dust bin. |

SMARTCLEAN Robotic Vacuum USER GUIDE 1605 SERIES PDF
SMARTCLEAN® Robotic Vacuum USER GUIDE 1974 SERIES PDF
Comments