
When Bob faces an uncomfortable situation, he will notify you by displaying ERROR, coupled with a two-digit number on his screen. Each number corresponds to a certain issue Bob is having.
| Error Codes | Solutions |
|---|---|
| 00 | Error Code 00 pertains to an issue with Bob’s left wheel. Start by checking the left wheel for jamming. Use the cleaning tool or compressed air to remove any dust or debris that may be jamming the left wheel. If this does not solve the problem and Bob still shows Error Code 00, perform a checkup test to see how the wheels respond to the test. |
| 01 | Error Code 01 pertains to an issue with Bob’s right wheel. Start by checking the left wheel for jamming. Use the cleaning tool or compressed air to remove any dust or debris that may be jamming the left wheel. If this does not solve the problem and Bob still shows Error Code 01, perform a checkup test to see how the wheels respond to the test. |
| 02 | Error Code 02 means Bob’s main brush is unable to move freely. Remove the main brush using a Phillips head screwdriver, and clean it thoroughly from end to end. You may use a pair of scissors to cut hair or thread wrapped around Bob’s brush, or a pair of tweezers to remove congestion from the motor area (the square metal indentation where the main brush is held). If Bob displays Trouble Nr 02 while cleaning on a shag carpet or rug, you may remove his main brush and allow him to vacuum without it. |
| 03 | Error Code 03 means Bob’s front wheel is unable to move freely. Remove debris congesting the front wheel using compressed air and the cleaning tool. If the congestion is not removable from the outside, disconnect the front wheel using a Phillips head screwdriver for leverage, and remove the obstruction. For a comprehensive how-to video, visit owners.bobsweep.com. |
| 04 | Error Code 04 means Bob’s ground detection sensors are blocked or dirty. Bob’s four, oval-shaped edge sensors are located on his bottom, near his bumper. Wipe the sensors using a clean, dry cloth or dust them using compressed air. If Bob displays this Error Code while working on dark-colored carpet or patterned flooring, you may need to blindfold him. |
| 05 | Error Code 05 means Bob’s wall sensors are blocked or dirty. Do a visual check on the transparent stripe on Bob’s bumper. If it is too dirty for you to see what is behind it, wipe it with a clean, damp cloth. To ensure nothing is jammed under the bumper, gently tap it and use compressed air to clear it of debris. If the issue persists, try running a checkup test on Bob. |
| 06 | Error Code 06 pertains to Bob’s touch sensors. It is likely that a small piece of debris is trapped under the bumper. Slowly and carefully tap on Bob’s bumper to clear out any obstructions. Use compressed air to clear it of dust and debris. Press on both ends of the front bumper until you hear a tiny ‘click’ sound. If the bumper is not clicking on its ends, it is possible that one or more of Bob’s touch sensors has a broken arm and needs to be replaced. |
| 07 | Error Code 07 means Bob’s main brush is not properly installed. Use a Phillips head screwdriver to remove the main brush and put it back in place. Make sure the brush’s square metal end is well fitted into the corresponding square metal part on the main brush holder. |
| 08 | Error Code 08 means Bob’s dustbin is not properly installed, or his dustbin’s metal contact points are dirty. Remove Bob’s dustbin and empty it. Turn the dustbin around and gently wipe the two metal connectors on its bottom. Lastly, clean the metal contact points inside Bob where the dustbin is inserted. |
| 09 | Error Code 09 generally means Bob’s mainboard is malfunctioning and needs to be replaced. Bob likely needs to visit the bObsweep hospital for treatment! But don’t worry, Bob’s doctors are just an e-mail away. Send a short explanation to support@bobsweep. com, and leave the rest to them! |
When bObsweep faces an uncomfortable situation, he will try to notify you of the issue. If Bob ever stops in the middle of his cleaning with the Trouble Nr. or Error sign lit on the screen, read the two digit code (00 to 09) on the screen. Here are the codes, the likely cause for the trouble, and what to do in case of each code. Additionally, bObsweep is equipped with a self-checkup feature to allow you to test the functionality of its various parts and sensors.
Replacing Bob’s Battery
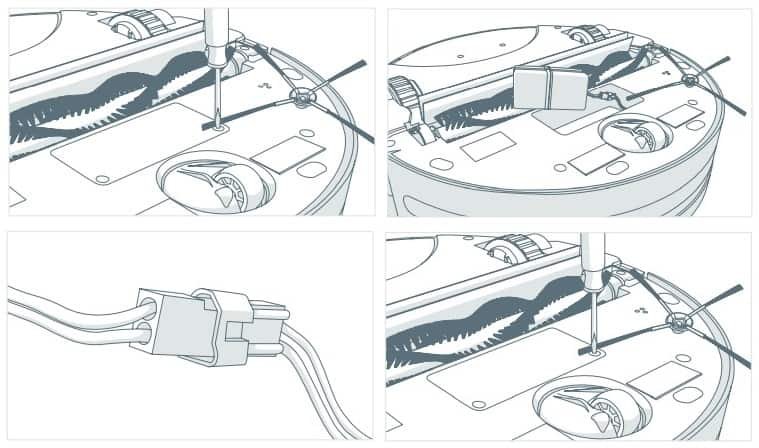
- Remove the battery cover on Bob’s underside using a Phillips head screwdriver.
- Lift the battery out of its compartment, and unplug the connecting wires.
- Plug the new battery in and slide it into the empty compartment.
- Re-tighten the screws on the battery cover.
Home Checkup Test
If Bob is not performing as well as he used to, you can diagnose the problem with a simple home checkup test. If Bob fails any part of the checkup test, he may need a replacement part.
Put Bob in checkup mode:
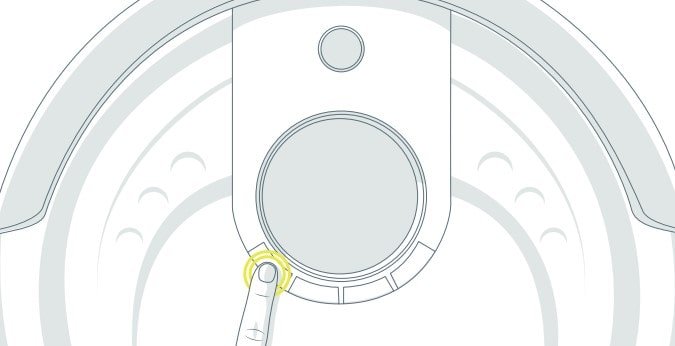
- Flip Bob’s power switch OFF and place him on a light-colored surface.
- While holding down the home button on Bob’s cover, turn Bob’s power switch ON.
Bob will chirp three times to let you know he is now in checkup mode. The screen will show a word or a number sign. You may release the button. Do not press any additional buttons.
Step One: Ground Detection Sensors
Right after Bob enters checkup mode and while Bob is on the floor, look at his screen. You should see four lights indicating AUTO, TIME, SPOT, and UV lit on Bob’s display. If all four lights do not turn on upon entering checkup mode, flip Bob over and wipe his ground detection sensors with a clean cloth. Check again and see if all four lights turn on.
To test the ground detection sensors, lift Bob about 6 inches off the ground (more than 15 cm). You should see the four lights turn off. If all four lights turn off while Bob is lifted, put Bob back on the floor and continue to the next step without pressing any additional buttons.
Step Two: Wall Sensors
Use a thick, flat, and white surface to imitate a wall and drag it around Bob’s bumper. The third battery bar, second battery bar, first battery bar, and the words DIRTY and ERROR should light up one-by-one on Bob’s screen as you move your imitation wall around his bumper.
You may now move on to the next step of the checkup test. Do not press any additional buttons.
Step Three: Touch and Bumper Sensors
To move on to this test, press the home button on Bob’s cover twice. Bob’s screen will go blank. Press on the left side of Bob’s bumper and the battery bars should light up on his screen; press on the right side and the word ERROR should light up. If you press the center of the bumper, both the battery bars and ERROR should appear at the same time. If either icon fails to light up, it is likely that Bob needs a new bumper.
Step Four: Display Screenx
Press the home button one more time. Each word and icon on the screen should light up in a repeating rotation.
Step Five: Brush and Suction Power
After the cycle has finished, press the home button again. Now press the home button. In this mode, the brushes should start rotating and you will feel air flowing from the back of the dustbin. Ignore the signs and numbers on the display in this test mode. If you do not feel air flowing out of the dustbin, then Bob’s vacuum motor may need to be replaced.
Step Six: UV Light and Wheels
The final step is to test Bob’s UV light and wheels. Lift Bob off the floor to keep him from running away! Then press the button and his wheels will drive forward. Next, flip Bob over and you will see his UV lamp light up. Press the button once more. Bob’s wheels will drive backwards and his UV lamp will turn off.
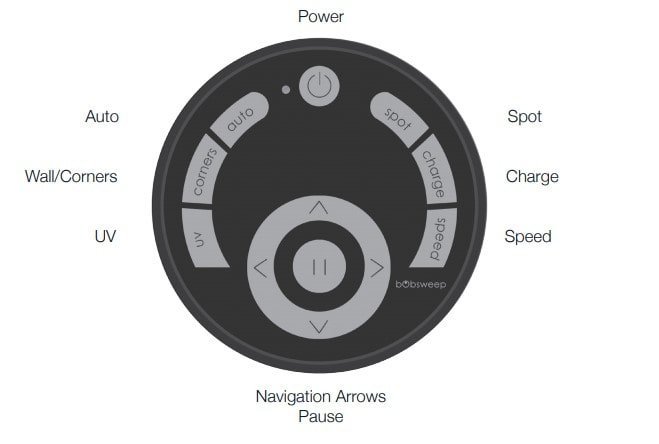
Remote Control
The remote control works at an average distance of 10 feet. It has to be pointed directly at bObsweep with no obstacle blocking the signal. bObsweep’s remote has the following buttons:
bObsweep Pro Robot Vacuum Cleaner Manual PDF
Comments