
Failure information which may appear during use.
| Failure Codes | How to solve |
|---|---|
| E001 | Ground detection sensors. Clean the sensors at the front bottom of the vacuum. |
| E002 | Main brush. Clean rubbish such as hair and thread wrapped on the brush. |
| E003 | Power off. Use the adaptor to charge, after fully charged, then use again. |
| E004 | Left & right wheel. Check the left and right wheels are clear from any dust build up. |
| E005 | Dustbin issue. Check the dustbin is connected correctly to the vacuum. |
| BEEP | Battery. 1. Take out the battery from the unit and wipe the contact plates. 2. Replace the battery and allow the robot to recharge overnight. 3. If the problem still exists please contact the after sales service company. |
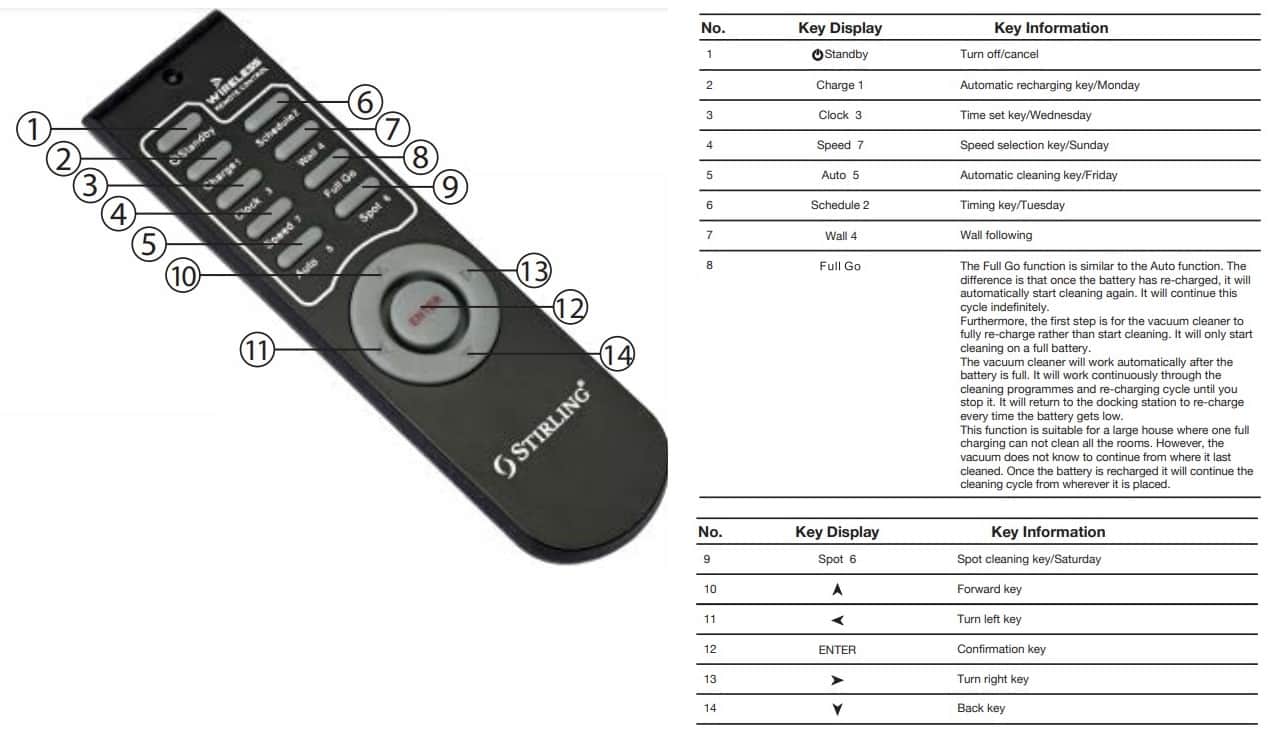
The above failure codes will appear on the screen automatically. If the failure still exists after the above check, please contact the after sale service support number. Ensure you have charged the vacuum for 12 hours before first use even if the battery is not flat. The following steps are very important, or the remote control may fail. You should check the code of the remote control and vacuum so that they can function together.
- Check that the remote control and vacuum have enough power. Turn off the vacuum, press ENTER on the remote control for more than 4 seconds, and then turn on the vacuum without releasing ENTER on the remote control. After the vacuum beeps twice, release ENTER, then the code check set is finished.
- If you fail to hear a beep during the code check, just repeat the above process.
Cleaning
Initially check the dustbin, filters, mop pad, brushes and wheels daily to see the impact of your use. For example if you have a pet that sheds you may have to clean every couple of days. You will be able to determine this yourself. You should not allow the dustbin to get very full as is will diminish the productivity of your robot vacuum cleaner, and may cause damage.
Cleaning the Dustbin, and HEPA Filter
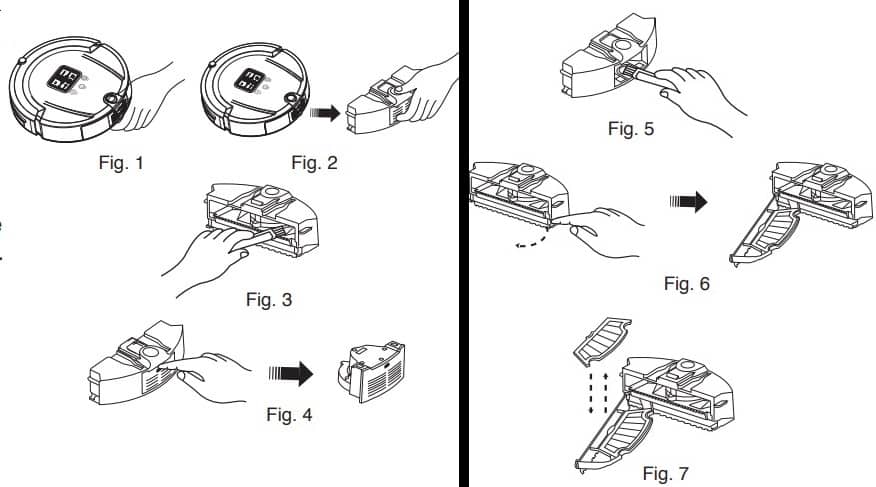
- Extract the dustbin by pressing the dustbin release key on top of the vacuum (Refer Fig. 1,2)
- Empty the dust from the dustbin, and then clean the inside with the dust brush supplied (Refer Fig. 3)
- Press the air outlet release key and the air outlet will pop out automatically (Refer Fig. 4)
- With the air outlet unit removed, clean the air inlet/outlet with the dust brush (Refer Fig. 5)
- Release the HEPA dust filter bracket to slide it open by pulling the semi- circulor tab on the bracket with one hand while pulling the fastener down with the other hand (Refer Fig. 6)
- Take out the HEPA dust filter by inserting your thumb in the space between the filter and bracket and pulling the HEPA dust filter up out of the bracket. Clean the dustbin in water (Refer Fig. 7).
- Clean the HEPA dust filter with a hairdryer or the dust brush (Refer Fig . 8 and Fig. 9).
- After cleaning, assemble the unit as it was before. CAUTION: Ensure the dustbin and the HEPA dust filter are completely dry before reassembly.
Stirling Robot Vacuum Cleaner Troubleshooting
| Trouble | Solution |
|---|---|
| The vacuum doesn’t work or cleans poorly | • Check whether the switch has been turned on. • Check whether the dustbin, filter and air outlet is clean, and whether the side brush works. • Check whether the battery voltage declines quickly. If so follow the steps below. |
| Battery problems or the voltage decreases quickly | Replace the battery and allow the robot to recharge overnight. |
| The remote control doesn’t work | • Check the battery status of the remote control. • Check the battery status of the robot vacuum. • Check the code between the remote control and vacuum. • Check whether the remote control is within the available scope of the signal transmitting. |
| The vacuum cannot charge automatically | • Check whether the adaptor is connected properly with the charger. • Check whether the battery power is too low. If so, charge the vacuum with the adaptor directly. • Make sure there is no barrier in front of the docking station. • Use the remote control to direct the vacuum to go back to the docking station. |
| Increased noise while cleaning | • Check the dustbin and filter. • Check whether the brush or side brush is dirty. |
| The vacuum stops working suddenly and rings intermittently | Check the failure codes on the display. |
| The vacuum backs off continuously | • Avoid use in sunlight or on dark coloured carpet. • Pat the front bumper. |
| The vacuum drops from the stairs | Clean the ground detection sensors at the front bottom of the vacuum. |
| The vacuum cannot Auto Charge after not using the appliance for a long time | Use the adaptor to fully charge first. |
| The vacuum has stopped working, but no error code is displayed | Don’t disassemble the vacuum. Please contact the after sale support number. |
Stirling Robot Vacuum Cleaner INSTRUCTION MANUAL PDF – Model Number EE-9248
source: stirlingappliances.com.au
Comments